
Sunday, August 8, 2010
Tuesday, August 3, 2010
How a Light Meter Works
A light meter sees the entire world as gray. Reflected light meters, which are in all cameras, can easily be fooled to create an exposure that is too dark or too light. Incident light meters accurately record the light in the scene.

Better Pixs in 90 Clicks by Timothy Mielke is licensed under a Creative Commons Attribution-NonCommercial-ShareAlike 3.0 Unported License.
Based on a work at milkywayphotos.blogspot.com.
Sunday, August 1, 2010
Going on the Digital Diet
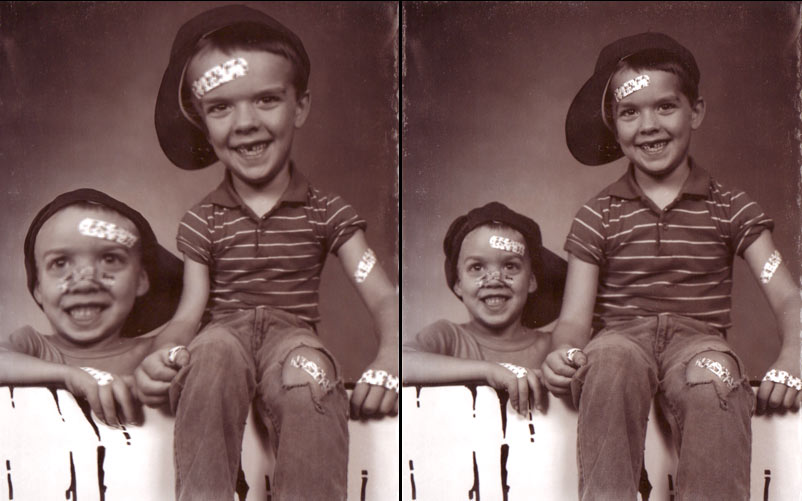
If you could study every magazine cover and advertisement you would be amazed at the editing done to make the models look attractive. Almost every major magazine cover and advertisement uses post-production effects to minimize unattractive features. There is a good chance that the photo editing digitally helped many of the attractive models lose a few extra pounds. The Adobe Photoshop program can quickly and easily give anyone a digital diet in minutes using the Liquify tool.
 |
| Digital Diet with Photoshop Liquify Tool |
 |
| Before Weight Loss Liquify Diet |
Dramatic Editing Techniques
Have you ever stared at a fine art photograph and wondered just how they could create such a dramatic and compelling photograph? Even the best photographs can benefit from subtle and sometimes bold post-production work. While the importance of capturing a good composition with proper exposure cannot be minimized, photo editing is essential to creating a dramatic, cinematic look.
 |
| Edited with Levels, Saturation, and Gradient Adjustment Layers |
 |
| From the Camera with no Editing |
 |
| Actual Adjustment Layers Used |
Monday, July 26, 2010
Panning and Zooming Techniques
The three camera settings that control the exposure are the aperture, ISO, and the shutter speed. If one of these setting changes, one of the other two settings must change to have an equivalent exposure. For example, if we have an exposure of f/5.6, 1/60, and ISO 100 and change the f-stop to 4.0, we must change the shutter speed or the ISO speed by one stop darker. Our new equivalent exposure could be f/5.6, 1/60, and ISO 50 or f/5.6, 1/125, and ISO 100. As any experienced photographer knows, all of photography is a compromise in one way or another. Learning what camera setting to change for the best quality picture can be a challenging task. Once you begin to master the concepts of exposure vs quality, you should try to be creative with your photography technique. These techniques will help you to keep your photographic juices flowing.
Panning Technique
 |
| Shutter 1/30, Panning at Full Sprint |
Zooming Technique
 |
| Shutter 1/30, Zooming from 28mm - 180mm |
 |
| Shutter 1/30, Panning Technique |
Saturday, July 17, 2010
How ISO Affects Image Quality

Unlike film, digital noise is never considered desirable or artistic. As digital cameras become better, the noise amount is becoming less noticeable even at high ISO speeds. All grain and noise is usually not very noticeable at a small viewing size. The grain or noise becomes more noticeable as the print enlargement size increases. There are filters in Adobe Photoshop to simulate the grain look for digital images and to help reduce the amount noise from higher ISO settings.
The decision of what ISO to use depends on the amount of light in the scene and the required shutter speed of the camera. If you are trying to freeze action in an indoor setting, the ISO speed will usually range around 800-3200. The increased light sensitivity makes for a faster shutter speed setting to enable the freezing of the action. When shooting still life, the shutter speed can be slower if using a tripod. This allows for the lowest ISO setting to be used to ensure the lowest amount of grain or noise in the image.
Friday, July 16, 2010
Controlling Depth of Field


The optics involved with focusing is a fascinating study all by itself, but when dealing with depth of field, the setting of the lens’ focal point is critical. The focal point is the exact distance set on the lens. Whatever the focal point is set at will always be the sharpest portion in the scene. The average focusing distance usually ranges between several feet to infinity. Most SLR lenses show the distance in feet or meters on the side of the lens. From the initial focal point, one third of the range in front and two thirds of the range in the back of the scene will be the depth of field. For example, if we set our lens to focus at 10 feet the acceptably sharp range could be 5 feet to 20 feet. The total distance range of what is sharp is determined by several other factors that are listed below.
Aperture Size
The aperture works the same way as the human iris regulating the amount of light that reaches the image recording sensor or film. The term f-stop represents the size of the aperture opening. As the f-stop number becomes larger, the size of the aperture becomes smaller. As the aperture becomes smaller, the amount of depth of field increases in the photograph. For example, a photograph at f/4 will have a narrow depth of field (sharper focusing) than a photograph at f/16.
Focal Length
The focal length is the physical length of the lens to the focal plane (sensor or film back of the camera). A larger focal length will make the subject larger in the frame. If you stand at the same location and zoom in (use a bigger millimeter number), the picture will have less depth of field than if you zoomed out (use a smaller millimeter number).
Distance of the Subject
If you use the same focal length and aperture size and only change the distance of the subject and focusing, the amount of depth of field will also be different. As the distance to the subject becomes closer, the depth of field becomes narrower. This factor becomes extremely critical when doing macro photography. Most close-up and macro photography can have less than an inch of focus range that is completely sharp. The reverse is also true. When photographing landscape photographs, the vast distance allows for much more depth of field.
Thursday, July 8, 2010
What Makes a Good Photograph?

Lens quality and selection are important factors that can make the difference between a good and a great portrait. Many of the starter kit lenses sold with dSLR cameras are considered all-purpose lenses. They work well in lots of light and usually only cost a few hundred dollars. Excellent quality zoom lenses can easily cost in the thousand dollar price range. The professional range lenses help capture better contrast, sharpness, and color purity than their cheaper alternatives. The lens length (wide or close) can create a difference in portrait quality. The wider angle lenses tend to create some distortion which can make a person appear disproportioned with the rest of the scene. Longer lenses help to create blurry backgrounds that place the attention on the subject and avoid distractions from elsewhere in the frame.

Finally, whether you are using a cell-phone camera or a $20,000 medium format camera, all great photographs start with pleasing composition. Using the rule of thirds as a guideline can help to create pleasing arrangements. Think of the rule of thirds as the tic-tac-toe rule. Where the two lines connect is usually the most emphasized part of a picture. A general rule of thumb is to keep the eye line or horizon on the upper third. Before snapping the shutter, look around the frame for anything out of place. Do not take the picture until you have checked the foreground and background for anything distracting. Learning which angles are pleasing and how to frame a scene comes by lots of practice. An excellent way to develop a photographic eye is to study photographs. Ask yourself, what makes this a good picture? Why could the photographer not see the light post behind her head?
No matter where you live, there are enough nearby pictures opportunities to keep you busy for a lifetime. So why not grab your camera and show the world through the eye of your camera lens. Photography is a skill that is not developed overnight so remember, “The more you look to learn, the more you will learn to look.”
Creating Denture Hoist
After creating my first two stop-motion animation shorts “Bean and Todd” and “Big Baby,” I wanted to embrace a larger project that would run around 20 minutes on screen. The idea for Denture Hoist came about when I was shoveling an elderly lady’s flat roof after a large snow storm. The germ of the film was based on my experience on the rooftop and can be seen by the winter setting and Santa Claus character. The basic plot was about a brilliant, scientist boy who sneaks down a chimney and tries to steal a set of gold dentures to pay off his debts he gathered after blowing up his parent’s garage during a science experiment.
Tuesday, June 29, 2010
Big Work, Big Baby

Early on in the filming I purchased a Sony Digital 8 camcorder which made the process much easier and the quality better. There was no more fighting with the broken down VHS camcorder. Using the Digital 8 camcorder taught me to use manual white balance and manual focus for optimum results. If you do not use proper white balancing, the colors of the film will not look correct. Using the manual focus helped to avoid occasionally auto focusing shifting errors.
The book by Marc Spess said that recording the audio before the filming would greatly help. I found that it was much easier to know proper timing of clips when the audio track is already laid down. Unfortunately I had created the characters before learning about using armatures from Marc Spess. Armatures are basically aluminum skeletons on which the clay characters are molded over. Having the metal support allows for ease of animated motion without gravity pushing the arm or leg to the ground. Also notice that there were no speaking parts for any of the characters in the film. This was intentional to avoid the need for lip syncing each dialog piece. This technique alone saved my countless hours and headaches.
Monday, June 28, 2010
Lots of Work, Little On Screen

Stop-motion animation has been used to entertain people for generations. In the 1950s and 1960s the popular Gumby Show aired which included a little animated clay humanoid figure. In the 1980s and 1990s many other videos used the stop-motion animation art form.
I was introduced in 1997 to the Wallace and Gromit stop-motion television short "The Wrong Trousers," which changed the course of my life. The half and hour short not only made me laugh uncontrollably, it also sparked my interest to figure how the entire production was created. In the next few months, I analyzed large portions of the "Wrong Trousers" frame by frame and researched the art of stop-motion animation by carefully studying the behind the scenes content on the Wallace and Gromit episodes.
Starting my freshman year of high school I started to record my own stop-motion animations using my parents working, but worn, VHS camcorder. The large camcorder needed to have the view finder held in place with athletic tape because of its age and condition. Having little experience or money to spend on my new found passion, I used my younger brother’s Duplex Lego sets to prop the camera into a halfway stable position. My first clips used a Godzilla action figure, complete with movable legs, arms, tail, and head, to destroy the local toy town. For the video capture I would quickly hit the record button on and off which rendered a playback rate of about 3-5 frames per second depending on my mind and finger’s reflexes. These first videos were extremely rudimentary but I was fulfilled to see the few short seconds of my work on screen in exchange for the long hours of work.
After creating a handful of other short stop-motion clips, I wanted to do a short story. One night I had a dream about a talking bean who meets a toad in the everglades and immediately strikes a friendship. Tragically I awoke when the bean and toad where eaten in a restaurant. Excited and inspired by the dream I could not get back to sleep but began to create a story in my head based on my strange dream. Something in my head was telling me that this was the germ for my short story. Getting up was no hard task that morning while I wasted no time telling my family my dream while eating breakfast.
Within a few days I had put together a beginning and ending to the script and started creating the simple characters, Bean and Todd. I purchased a cheap, $150 dollar ATI analog video capture card to put into my parent’s Pentium computer to enhance my production setup. Using the video editing software included with the capture card, I shot a couple of tests. Then I began filming the opening scene of "Bean and Todd" with the Bean in Mexico. Almost everything in the story was made up as I filmed each scene and all of the sets were designed with no real scale while being modified between scenes. Looking back I would never recommend starting any video project without a complete story, especially an animation project.
During the next six months with the help of my family, I would spend around 1,000 hours in the basement painstakingly animating my short film between a rate of 12-18 pictures per second of video. I learned much more than the art of animation. My patience toleration and technical knowledge also dramatically increased. A few months into production, an uncle would unexpectedly purchased me a tripod so I could ditch the Duplex Lego support system. See if you can notice where the video becomes more stable.
The completion of my first short stop-motion film sparked my interest and love for the video production world. Afterwards I went on to complete "Big Baby" while still in high school and started the lengthy project and incomplete project, "Denture Hoist." For my college education I choose Pillsbury Baptist Bible College and studied Photography, Business, and Bible. Currently I am teaching photography and video and working on my Masters degree in Multimedia Communications from the Academy of Art University. My desire is to teach young people how to effectively communicate the gospel of Jesus Christ through video and other media and it all started with a stop-motion project in the basement of my parent’s house.
Recently DreamWorks movies Chicken Run and The Curse of the Were-Rabbit have revived the art of stop-motion animation and opened the imaginations of more young people today. Check out www.animateclay.com or purchase "Secrets of Clay Animation Revealed" for some helpful tips in beginning clay animation on your own.
Friday, June 25, 2010
Photographing Lighting Effectively
Summer is officially here in the northern hemisphere and with the beautiful weather also comes the dangerous thunderstorms. In the last few days there have been multiple severe storms that have produced flooding in many Wisconsin counties. Yet for some courageous storm chasers the thrill of a lifetime is grabbing the camera and driving directly into the storm. Human beings have always appreciated the beauty of lighting bolt but capturing the essence of a storm in a picture can be extremely challenging for even the best photographer.
In order to get the best quality pictures, here are a few helpful tips to ensuring quality photographs.
Rule # 1 Always use the manual settings on your camera. While some point and shoot cameras are sufficient with manual controls, all dSLR cameras will have manual controls and give great quality results. Setting the manual focus is probably the most critical because of the low amount of lighting during a storm is difficult for auto focusing.
Rule # 2 Shoot in the RAW file format. Using the RAW format gives more information to use in editing the pictures later. On the flip side, RAW files are several times larger than JPG files so make sure you bring enough memory cards.
Rule # 3 Always use a sturdy tripod. Ideally it will have a quick release head so you can remove the camera on and off quickly if needed. There are several companies that make rigs to hold an umbrella over the tripod. You can, with a few clamps,a create an umbrella mount of your own to protect from the rain. Entry-level dSLRs are very sensitive to moisture and can be in need of repairs or even ruined with minimal rain exposure.
Rule # 4 Use the lowest ISO setting which is usually ISO 100 or ISO 200. This gives the best detail due to the low noise of the sensor.
Rule # 5 Experiment with shutter speeds between 5 and 30 seconds. Lighting travels the speed of light at 186,000 miles per second. Leaving the shutter open for several seconds allows time for the lighting bolt to be captured by the sensor. Because the night sky is dark, a long shutter speed is effective in capturing the lighting’s path.
Rule # 6 Try setting the aperture around f/8 and f/16. This helps allow for a greater depth of field which increases the focusing sharpness of photograph.
Rule # 7 Use a timed release shutter or a remote shutter release to avoid touching the camera during the exposure. This allows the camera to remain steady during the entire exposure which avoids the possibility of motion blur.
Tuesday, June 22, 2010
Who We Are
I am teaching in the New Media Communications and Photography Departments at